

Chocolate Ganache for Cakes & Cupcakes: The Ultimate Guide to Ratios, Filling, Piping & Covering Cakes
Everything You Need to Know to Make Smooth, Stable Chocolate Ganache Every Time!
Chocolate ganache is one of the most versatile recipes every baker should have in their collection. Whether you're filling a celebration cake, creating perfectly sharp edges beneath fondant, piping elegant cupcake swirls or pouring a glossy chocolate drip, ganache is a recipe you'll find yourself using time and time again.
The beauty of chocolate ganache is its simplicity. Made with just two main ingredients, chocolate and cream, it can be transformed into a silky filling, a sturdy cake covering, a whipped frosting or a luxurious glaze simply by changing the ratio of chocolate to cream.
If you've ever searched online for a chocolate ganache recipe, you've probably noticed that no two recipes seem to be exactly the same. One recipe recommends equal amounts of chocolate and cream, while another tells you to use twice as much chocolate. It can feel confusing, especially if you're new to cake decorating.
The truth is, they're often all correct.
The best chocolate ganache recipe depends on the type of chocolate you're using, what you want to use it for and even the temperature of your kitchen. Once you understand how ganache works, you'll never need to memorise endless recipes again. Instead, you'll know how to adjust it with confidence to achieve exactly the consistency you need.
In this complete guide, I'll walk you through everything you need to know about chocolate ganache, from choosing the right chocolate and understanding ratios to filling cakes, covering cakes, piping cupcakes, creating beautiful drips and solving common problems along the way.
Whether you're a complete beginner, an enthusiastic hobby baker or running your own cake business, this guide will help you make chocolate ganache with confidence.
What Is Chocolate Ganache
Chocolate ganache is an emulsion made by combining chocolate and cream.
When hot cream is poured over chocolate and gently mixed together, the cocoa butter from the chocolate combines with the fat and moisture in the cream to create a smooth, silky mixture.
Depending on how much chocolate you use, that mixture can be soft enough to pour or firm enough to cover an entire cake with a pallet knife.
A well-made ganache should always be:
Smooth
Glossy
Rich in flavour
Free from lumps
Free from oily patches
Stable enough for its intended purpose
One of the reasons professional cake decorators love ganache is because it offers incredible versatility. The same basic recipe can be adapted for many different uses simply by adjusting the ratio.
🍫 You can use chocolate ganache to:
Fill celebration cakes
Cover cakes before applying fondant
Pipe beautiful cupcake swirls
Create sharp cake edges
Make chocolate drips
Frost layer cakes
Fill macarons
Cover brownies and traybakes
Decorate desserts
Make luxurious truffles
Once you've mastered ganache, you'll find yourself reaching for it again and again. 🥰
Why Every Baker Should Learn Chocolate Ganache
If I could recommend just one decorating skill for every baker to learn, it would be how to make a good chocolate ganache.
Unlike many frostings, ganache is incredibly forgiving. It stores well, tastes delicious, creates beautifully smooth finishes and is often more stable than buttercream, particularly during warmer weather.
It's also one of the most professional-looking finishes you can achieve without needing lots of specialist equipment.
For anyone making cakes to sell, ganache provides excellent structure for stacked cakes and creates a strong foundation beneath fondant. For hobby bakers, it adds a luxurious finish that instantly elevates homemade cakes.
Perhaps the biggest advantage is its versatility. Once you understand the basics, you won't need separate recipes for every project. You'll simply adjust the amount of chocolate to create exactly the consistency you're looking for.
That's why so many professional cake decorators rely on ganache every single week.
Understanding Chocolate Ganache Ratios
One of the questions I'm asked most often is:
"What is the perfect chocolate ganache ratio?"
The answer is... it depends.
Ganache recipes are written as a ratio of chocolate to cream by weight.
For example:
2:1 ganache means:
200g chocolate
100g double cream
A 1:1 ratio would be:
200g chocolate
200g double cream
The higher the amount of chocolate, the firmer your ganache will become once it cools.
The more cream you add, the softer and more fluid it will remain.
There isn't one universal recipe because different chocolates contain different amounts of cocoa solids, cocoa butter, milk solids and sugar. This means dark chocolate, milk chocolate and white chocolate all behave differently.
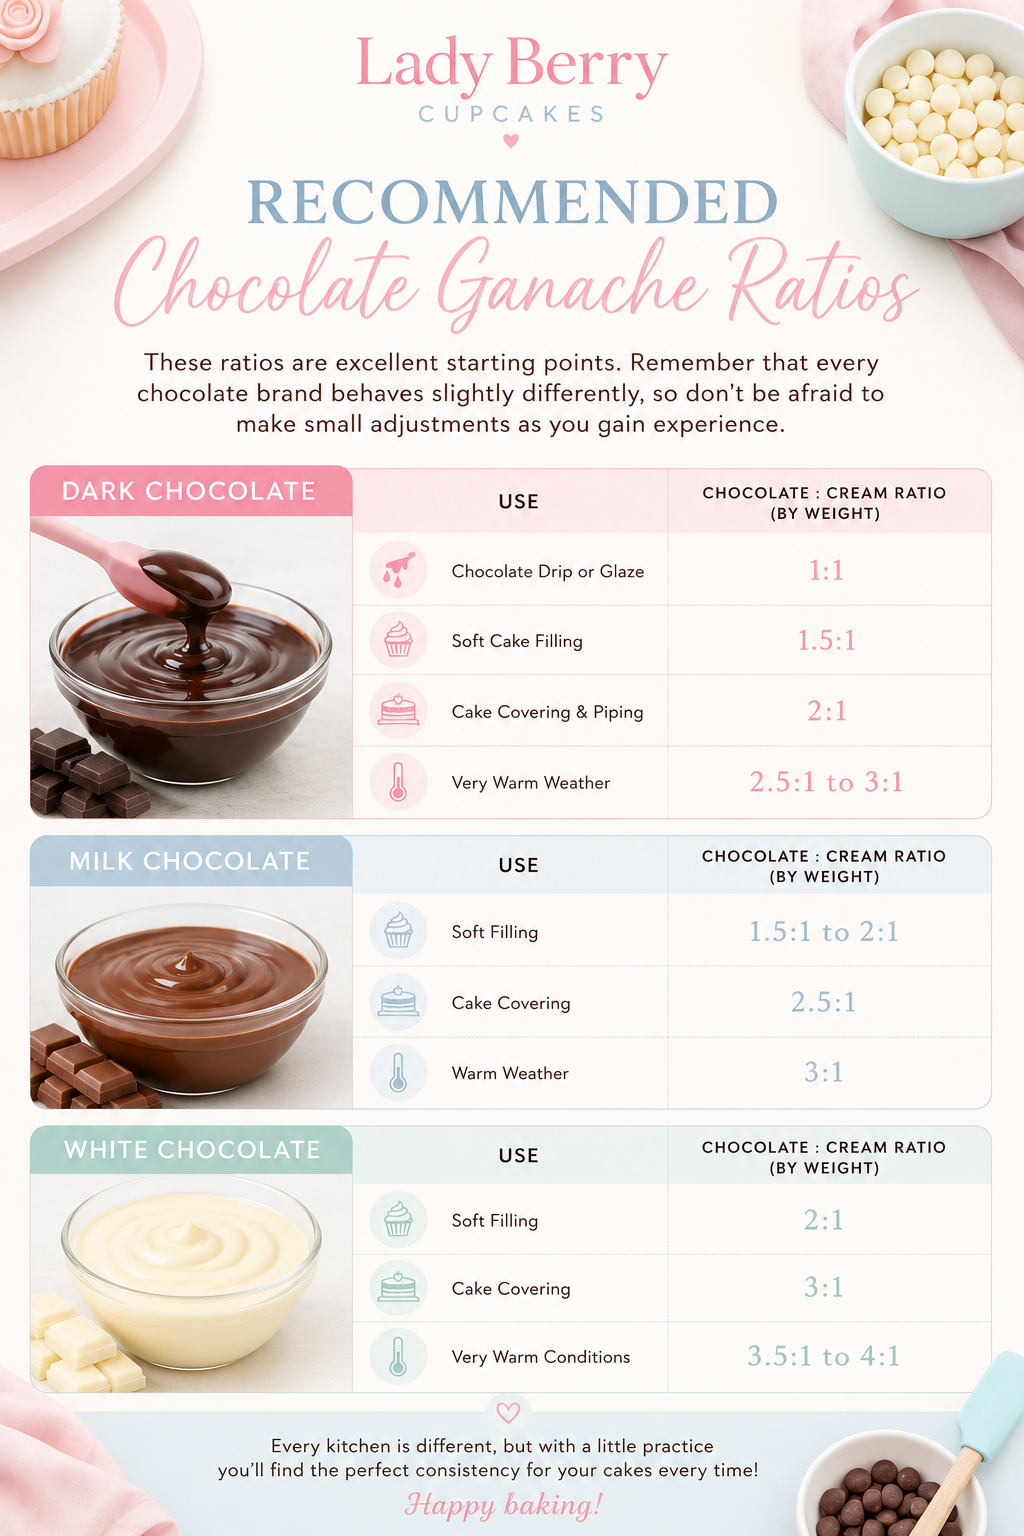
Why Different Chocolates Need Different Ratios
Dark Chocolate
Dark chocolate naturally contains a higher percentage of cocoa solids and cocoa butter, making it the easiest chocolate to work with.
It sets firmly, creates excellent structure and is ideal for covering cakes and creating sharp edges.
Typical cocoa percentages range from around 54% to 70%.
The higher the cocoa percentage, the firmer the finished ganache is likely to be.
Milk Chocolate
Milk chocolate contains less cocoa and more milk solids and sugar.
Because of this, it produces a much softer ganache.
To achieve the same firmness as dark chocolate, you'll usually need a higher proportion of chocolate.
White Chocolate
White chocolate behaves very differently because it contains cocoa butter but no cocoa solids.
It is naturally much softer and more sensitive to heat, so it generally requires the highest chocolate-to-cream ratio.
White chocolate also takes longer to cool and set, so patience is key.
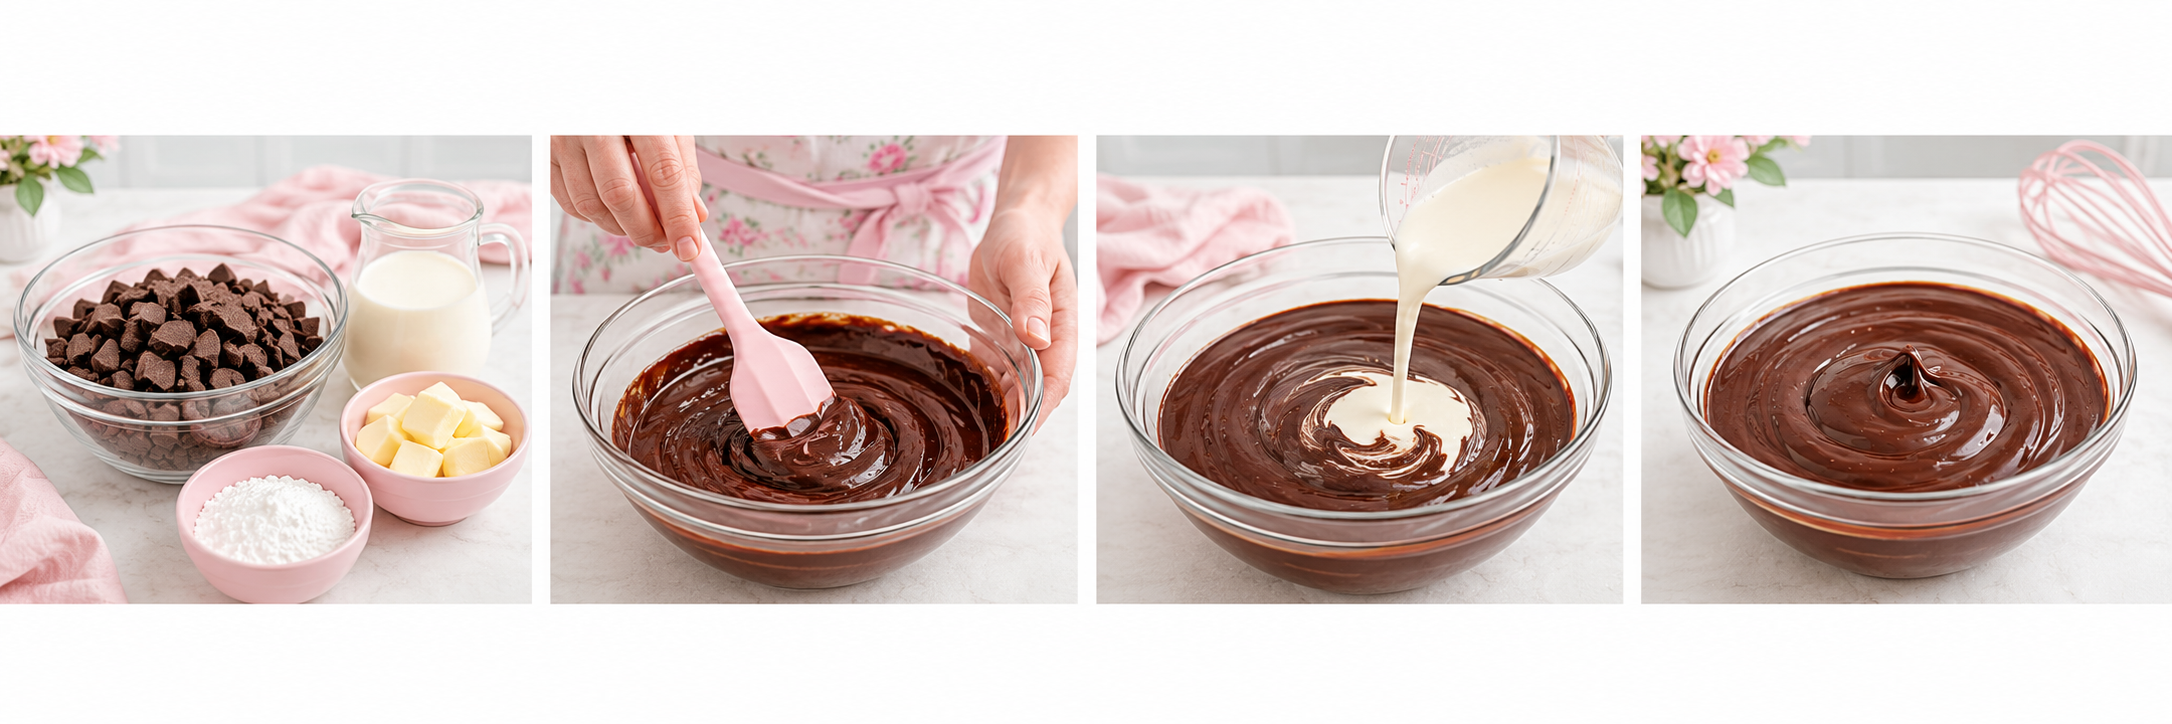
Choosing the Best Chocolate
Not all chocolate is suitable for ganache.
The quality of your chocolate has a huge impact on both the flavour and texture of the finished result.
For the best results, choose chocolate that contains real cocoa butter.
Professional couverture chocolate is ideal because it melts beautifully and produces an exceptionally smooth ganache, but many good-quality supermarket chocolates also work very well.
Avoid using:
Chocolate-flavoured coatings
Compound chocolate
Cheap waxy chocolate
Filled chocolate bars
Chocolate with biscuit pieces
Baking chocolate chips designed to hold their shape
Remember, chocolate is the star of the recipe, so the better the chocolate tastes, the better your ganache will taste too.
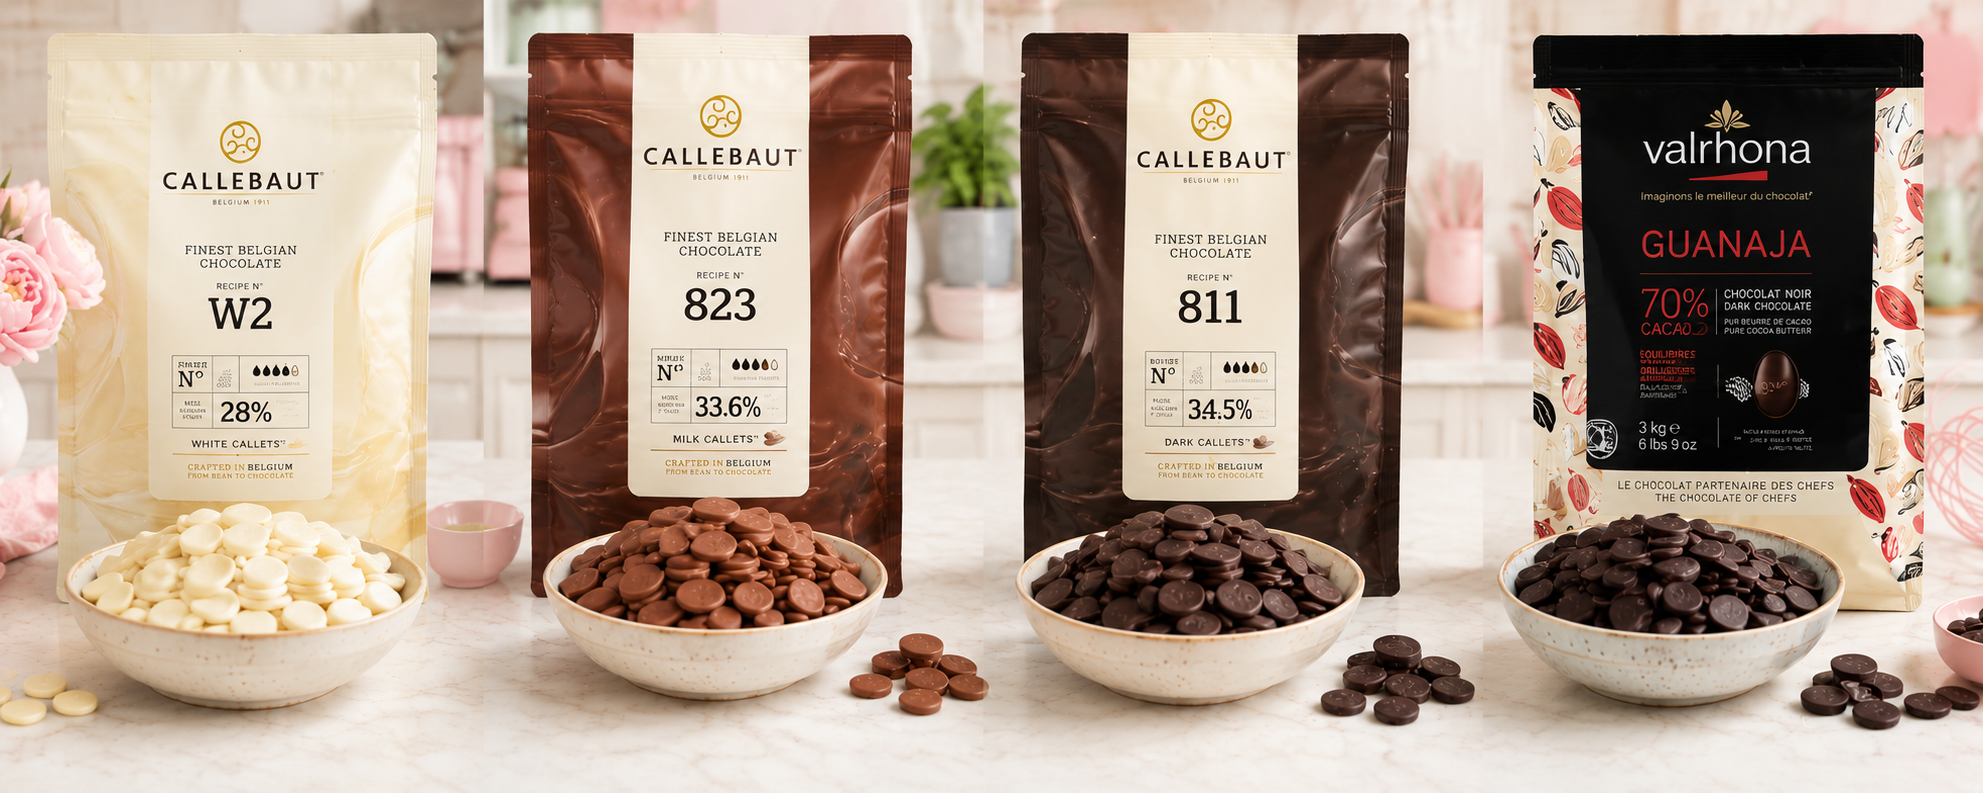
How to Make Chocolate Ganache
Step-by-Step Recipe
Making chocolate ganache is surprisingly simple, but taking your time is the secret to achieving a silky smooth finish.
Ingredients
Good-quality chocolate, finely chopped or chocolate callets
Double cream (heavy cream)
That's it!
The exact quantities will depend on the ratio you're using, but the method always stays the same.
Method
Place your chocolate into a clean, dry, heatproof bowl.
Heat the cream in a saucepan over a medium heat until it is steaming and just beginning to simmer around the edges. Avoid letting it boil vigorously, as overheated cream can affect the finished texture.
Pour approximately one-third of the hot cream over the chocolate.
Leave it undisturbed for one minute to allow the chocolate to begin melting.
Using a spatula, gently stir from the centre of the bowl in small circles. As the chocolate begins to melt, gradually widen your stirring motion.
Add another third of the warm cream and continue stirring.
Finally, add the remaining cream and continue mixing until the ganache is smooth, glossy and completely combined.
If you'd like an ultra-smooth finish, especially for covering cakes, use a blender with the blade fully submerged beneath the surface. This helps create a perfectly smooth emulsion while preventing unwanted air bubbles.
Did You Know You Should Never Whisk Ganache?
It's tempting to grab a whisk, but resist the urge.
Whisking introduces tiny air bubbles that may not be noticeable inside a cake, but they can ruin an otherwise perfectly smooth finish when covering cakes or creating chocolate drips.
A silicone spatula or spoon is always the better choice.
Slow, gentle mixing produces the glossiest results.
How to Use Ganache as a Cake Filling
Chocolate ganache makes an incredibly delicious cake filling because it's rich, smooth and stable.
Before filling your cake, allow the ganache to cool until it reaches a spreadable consistency. It should hold its shape while still being easy to smooth with a palette knife.
The ideal filling should be:
Smooth
Cool
Thick enough not to ooze
Soft enough to spread easily
Spread the ganache evenly over each sponge layer, leaving a small border around the edge. As you stack the next cake layer on top, the filling will naturally spread towards the edges.
If you're using softer fillings like caramel, jam or fruit compote, pipe a firm ring of ganache around the edge first. This creates a dam that keeps softer fillings neatly inside the cake and helps prevent bulging later.
How to Cover a Cake with Chocolate Ganache
Ganache is one of the most popular coverings for celebration cakes because it creates an incredibly smooth, firm finish that's perfect beneath fondant.
Start by filling and stacking your cake before chilling it briefly until stable.
Apply a thin crumb coat first to trap any loose crumbs.
Allow this layer to firm slightly before applying a thicker second coat.
Using a tall metal scraper or acrylic smoother, gently scrape around the cake while turning your turntable. Continue filling small gaps and scraping again until the surface becomes beautifully smooth.
For the sharpest finish, smooth the top edge by pulling the excess ganache towards the centre using a palette knife. Take your time Those beautiful harp edges are created through several thin applications, not one thick layer.
🍫 3 Tips for a Perfectly Sharp Ganache Finish
🍰 1. Get the ganache consistency right
Your ganache should be smooth and spreadable, similar to soft peanut butter. If it's too warm or runny, you won't achieve those crisp, straight sides.
📐 2. Use a scraper for super-sharp edges
Apply a generous layer of ganache, then use a metal cake scraper held completely straight against the cake while turning your turntable. Work around the cake several times, filling any dips and scraping again until the sides are beautifully smooth. For a sharp top edge, gently pull the excess ganache inwards towards the centre.
❄️ 3. Chill between coats and before covering
Once you've achieved your final smooth finish, put the cake in the fridge for around 20–30 minutes so the ganache becomes firm. This gives you a solid, stable surface for covering with fondant. Avoid leaving it uncovered in the fridge for hours, as condensation can become an issue when you bring it back to room temperature.
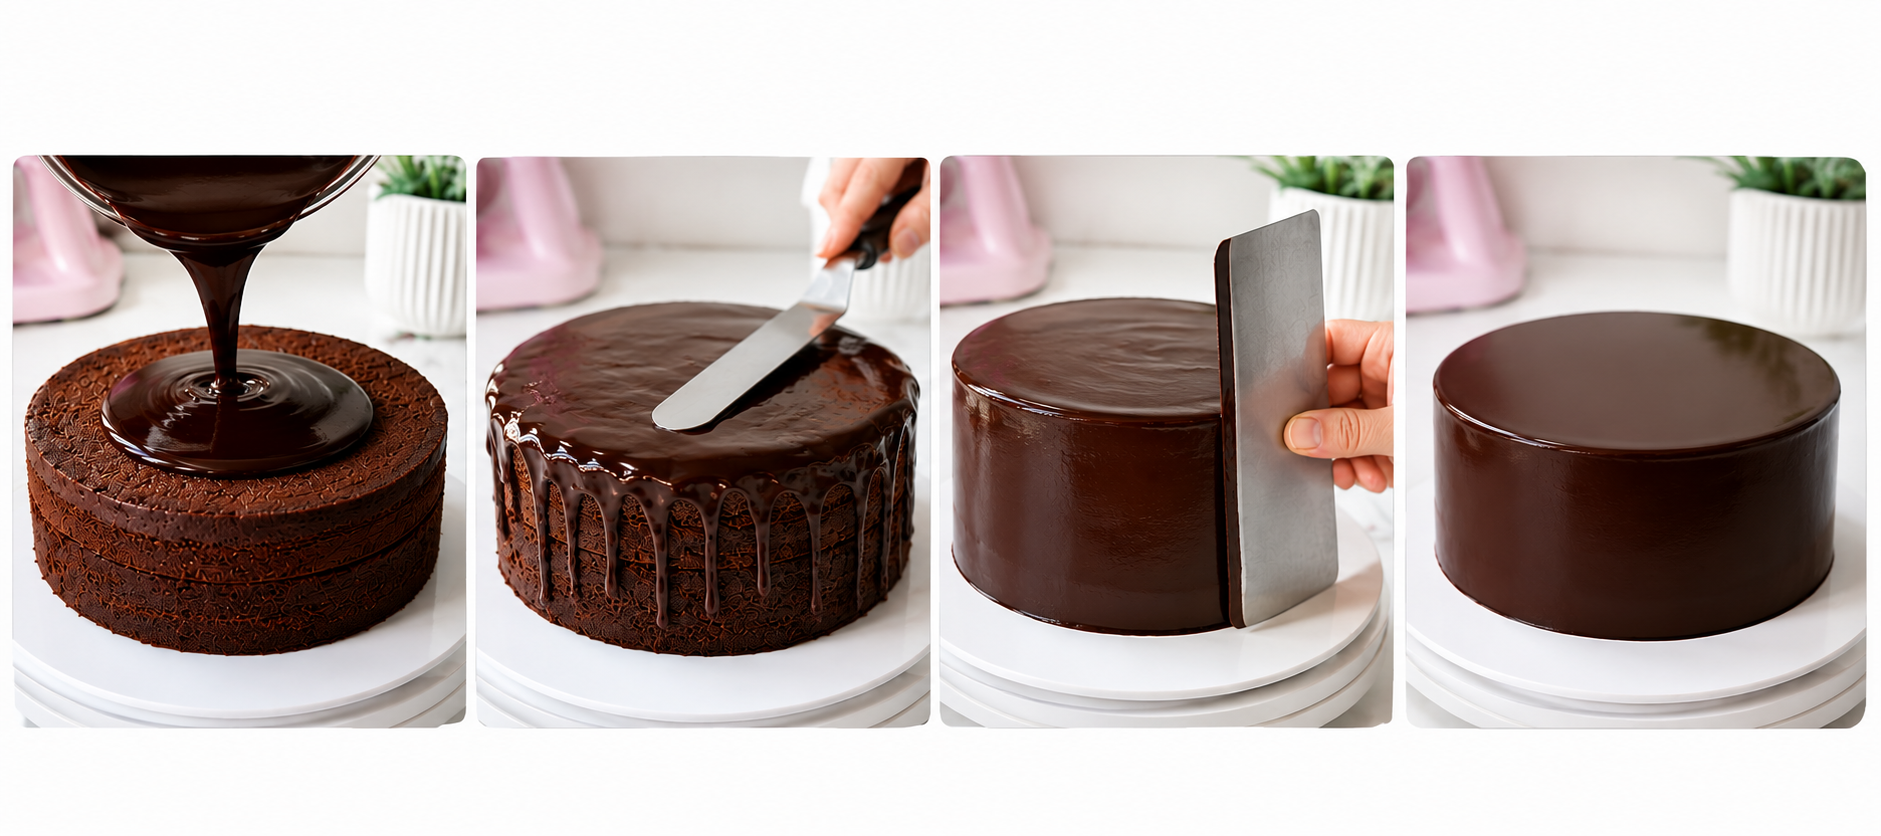
Creating Beautiful Sharp Edges
Professional-looking cakes aren't achieved through expensive equipment alone. They're created by patience.
For the best results:
Start with level cake layers.
Use a firm ganache.
Work in thin layers.
Keep your scraper perfectly upright.
Rotate your turntable smoothly.
Don't over-chill the ganache before your final scrape.
Remember, every pass of the scraper improves the finish.
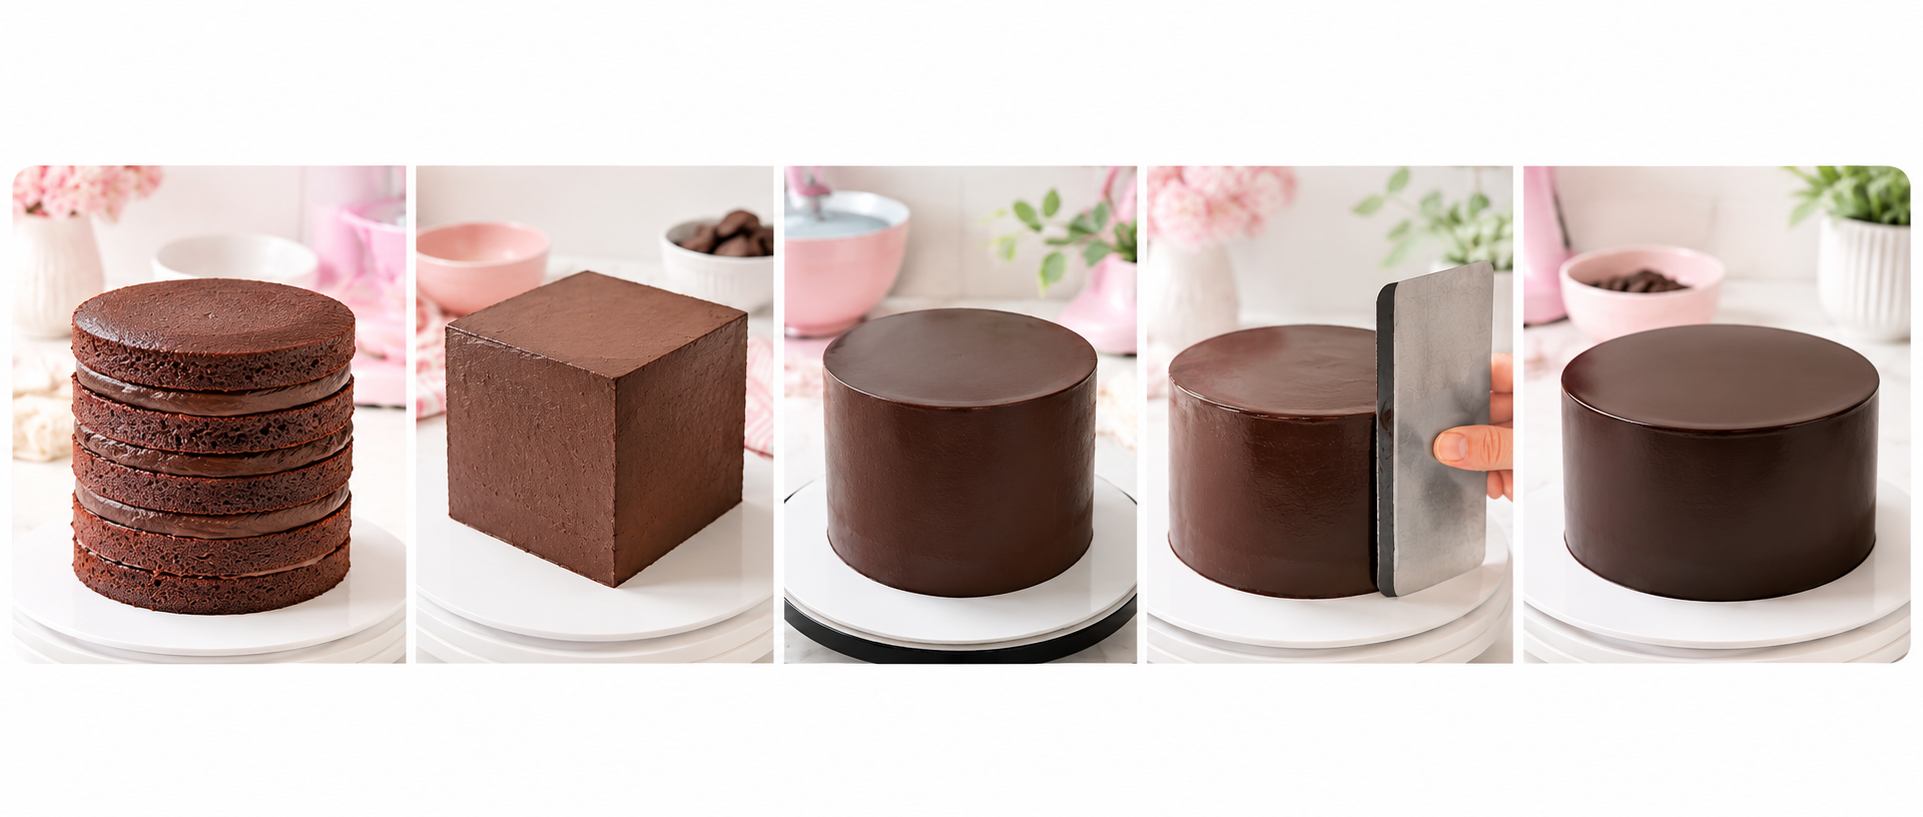
How to Make the Perfect Chocolate Drip
A chocolate drip should flow gracefully down the sides of your cake without running all the way to the cake board. The consistency is everything. If your ganache is too warm, it will race down the cake. Too cool, and you'll end up with short blobs rather than elegant drips. Always test one drip on the back of the cake first. If it travels too far, leave the ganache to cool for a few more minutes. If it barely moves, warm it very gently. Once you're happy, continue around the rest of the cake. For the neatest finish, always apply chocolate drips to a chilled cake.
Can You Pipe Chocolate Ganache?
Absolutely. Ganache creates stunning cupcake swirls and decorative borders. There are two ways to pipe it.
Unwhipped Ganache
This creates:
Crisp definition
Rich chocolate flavour
Firm rosettes
Smooth swirls
Allow the ganache to cool until it comfortably holds its shape before filling your piping bag.
Only fill the bag halfway to prevent the warmth of your hands from softening the ganache too quickly.
Whipped Ganache
Whipped ganache has a lighter texture and is perfect for:
Cupcakes
Layer cakes
Celebration cakes
Dessert toppings
To make whipped ganache:
Prepare your ganache.
Allow it to cool completely.
Refrigerate until thoroughly chilled.
Whip using an electric mixer until pale, fluffy and holding soft peaks.
Be careful not to overwhip. If you continue mixing after it reaches soft peaks, the ganache can become grainy or split. A good rule is to stop mixing as soon as it looks lighter in colour and feels airy.
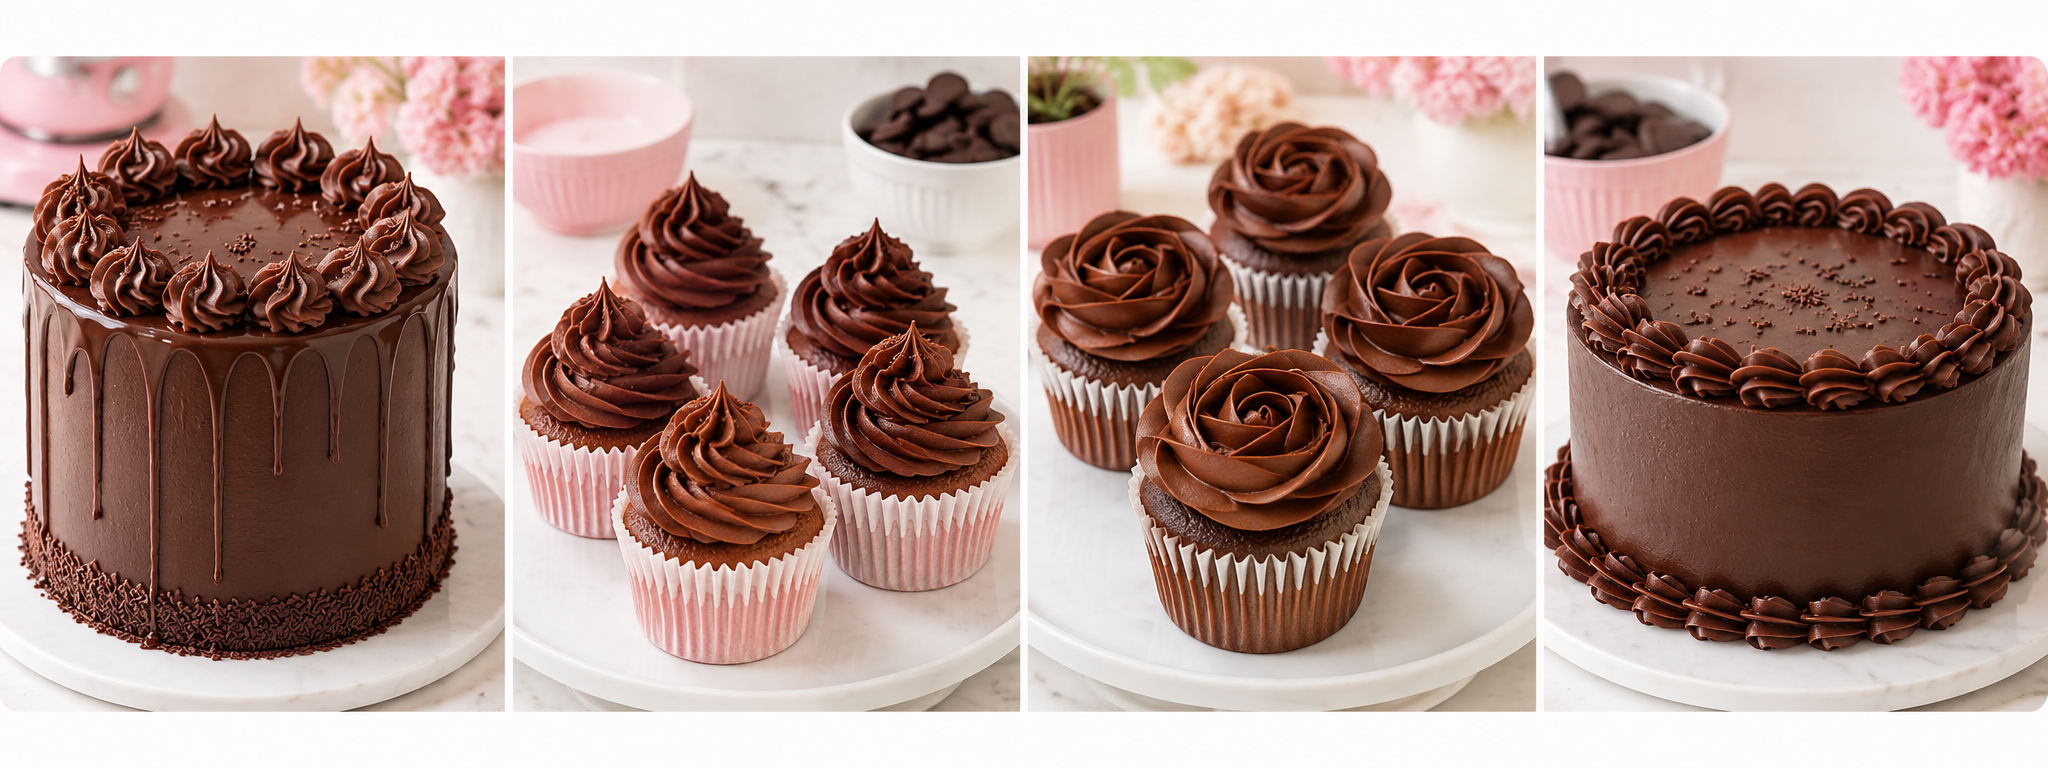
How Much Ganache Do You Need?
One of the questions I hear most often is, "How much ganache should I make?" Unfortunately, there isn't a one-size-fits-all answer because it depends on the size of your cake, how many layers it has, how thick you want your filling and whether you're covering the outside with ganache too.
As a general guide, these amounts work well for both filling and covering standard-height round cakes:
6-inch Cake
Approximately 700g to 900g of finished ganache.
8-inch Cake
Approximately 1.1kg to 1.4kg of finished ganache.
10-inch Cake
Approximately 1.6kg to 2kg of finished ganache.
If you're making a tall celebration cake with extra layers or deep fillings, you'll need a little more.
For cupcakes, these are good estimates:
Small swirl: approximately 25g to 35g
Large bakery-style swirl: approximately 40g to 50g
Making a little extra is always better than running out halfway through decorating.
Can You Flavour Chocolate Ganache?
Absolutely! One of the wonderful things about ganache is how easy it is to customise.
Although chocolate is the star of the recipe, adding complementary flavours can completely transform the finished result. Just remember that any additional liquid can slightly soften the ganache, so always add flavourings gradually.
Some of my favourite flavour combinations include:
🍊 Orange zest
☕ Fresh espresso or strong coffee
🌿 Peppermint extract
🌼 Vanilla bean paste
🍮 Salted caramel
🍓 Freeze-dried raspberry powder
🍒 Cherry flavouring
🥃 A splash of liqueur for adult celebration cakes
🥥 Coconut extract
🌰 Hazelnut flavouring
If you're using fresh fruit purées, remember they introduce extra moisture, so you may need to increase the amount of chocolate slightly to maintain the correct consistency.
How to Store Chocolate Ganache
Ganache stores beautifully, making it ideal for preparing in advance.
If you have leftover ganache, don't throw it away. It can often be transformed into another delicious bake later in the week.
At Room Temperature
Store in a cool kitchen for up to 2 days, covered well to prevent it drying out.
In the Refrigerator
Keep in an airtight container for up to one week.
When you're ready to use it again, allow it to come back to room temperature before gently warming if needed.
In the Freezer
Ganache freezes surprisingly well.
Store it in an airtight container for up to three months.
Defrost overnight in the refrigerator before bringing it back to room temperature.
Working with Ganache During Warm Weather
☀️ Summer can be challenging for cake decorators, but ganache often performs far better than buttercream when temperatures begin to rise.
If your kitchen is particularly warm:
Choose a firmer chocolate-to-cream ratio.
Work in the coolest room available.
Avoid placing cakes in direct sunlight.
Chill cakes only until firm enough to continue decorating.
Handle finished cakes as little as possible.
If you're covering a cake with fondant, always allow any condensation to disappear completely before applying the fondant. Patience here can make all the difference.
Common Chocolate Ganache Problems (And How to Fix Them)
Even experienced bakers occasionally have a batch of ganache that doesn't go quite to plan.
The good news is that most problems are easy to fix.
My Ganache Is Too Runny
This usually means it's still too warm.
Leave it to cool for a little longer.
If it's still too soft once cool, melt a little extra chocolate and gradually stir it in until you reach the consistency you need.
My Ganache Is Too Firm
Warm the ganache gently using short bursts in the microwave or place the bowl over warm water.
If necessary, stir in a tablespoon of warm cream at a time until it softens.
My Ganache Has Split
If your ganache looks oily or separated, don't panic.
This often happens if it has become too hot or has been overmixed.
Gently warm the mixture and slowly stir in a tablespoon of warm cream or milk. In many cases, the emulsion will come back together beautifully.
My Ganache Is Grainy
Grainy ganache usually means some of the chocolate hasn't melted completely.
Warm it gently while stirring slowly until everything becomes smooth.
My Ganache Won't Set
White chocolate and milk chocolate naturally take much longer to firm than dark chocolate.
If you've waited several hours and it's still very soft, your ratio may contain too much cream.
Simply melt a little extra chocolate and gradually stir it in.
Frequently Asked Questions
Can I make ganache the day before?
Yes. In fact, many decorators prefer to make ganache a day ahead because it has plenty of time to mature and firm naturally.
Can I colour chocolate ganache?
You can colour white chocolate ganache using oil-based food colouring. Water-based colours are not recommended as they can cause the chocolate to seize.
Which chocolate is best for beginners?
Dark chocolate is generally the easiest to work with because it's the most stable and forgiving.
Is ganache better than buttercream?
Both have their place.
Buttercream is lighter and sweeter, while ganache offers a richer flavour, greater stability and a beautifully smooth finish. Many professional cake decorators use ganache beneath fondant because of the clean, sharp finish it creates.
🍫 Chocolate ganache is one of the most versatile skills every baker can master, and with a little practice, you'll soon feel confident using it for filling, covering, piping and decorating cakes and cupcakes. Don't be afraid to experiment with different chocolates, flavours and consistencies, the more you work with ganache, the easier it becomes. Most importantly, have fun, enjoy the process, and remember that every batch is another opportunity to build your confidence and create something truly delicious.
Try A Variety Of Other Lady Berry Recipes
Have you tried one of my Lady Berry Cupcakes recipes yet?
Whether you're baking for fun, creating treats for family and friends, or growing your own cake business, my recipes are designed to be simple, reliable, and easy to follow. Each recipe has been developed from years of real-life baking and teaching experience, helping you achieve beautiful, consistent results every time. Explore the collection and discover your next favourite recipe today.
Try the recipes:
Lady Berry Gingerbread Recipe
No Spread Cookie Recipe
Duffin Recipe
With more recipes regularly added!
Have fun making and decorating with Chocolate Ganache! 💕
To book your cupcake decorating workshop or party, email me below and let’s get your event booked in!
